
Thursday 30 June 2016
My Best Day Ever......
I have loads of seaside stamps. For some reason I am attracted to them but rarely use them on cards. When this beautiful set arrived in the post I just had to play and as it was card class the next day I made this simple card.
 I am used to colouring with paint so I always find using marker much more challenging however in this case the detail on the stamp did most of the hard work. I eventually turned to my reliable white gel pen to make the foam on the waves and the seahorse border really finished it off nicely.xx
Wednesday 29 June 2016
I can't stand the rain
A quick and really simple layout to show off those many, many rainy photos (I am adding to the collection as we speak). This paper was too good to cover with "stuff" so I used a craft knife and cut out some of the umberellas.
 I put red and yellow paper behind the holes and even added a bit of my own handwritin for the title.
 Love these wellie boots as well. stamped out and coloured. Brilliant.
 I used some of the cut out umberellas as decoupage pieces which gave the layout some depth. A busy layout and a bit out of my comfort zone but happy with it xx


Tuesday 21 June 2016
Blackberries
After making the Blackberry layout for the scrapbook class I really wanted to use the same theme in the card class. This is what I came up with.
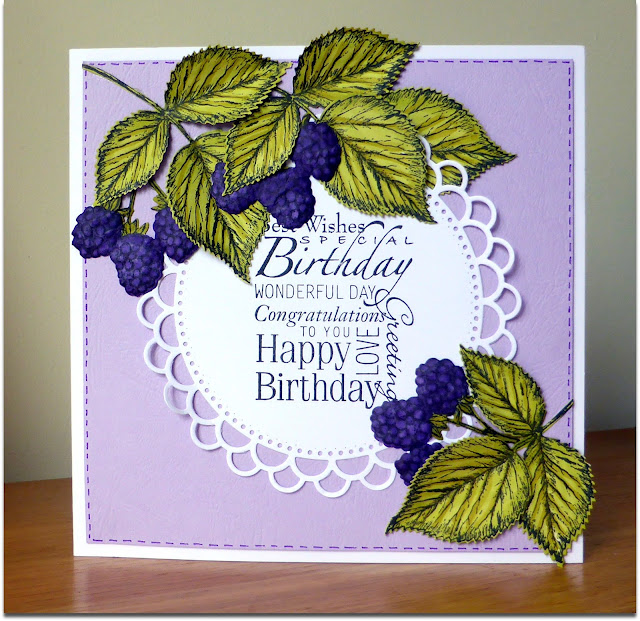 I think this stamp will also do as a raspberry as well so watch this space. Loving these wonderful stamps by Sheena Douglas xx

Friday 17 June 2016
Cuddles
When I showed this in class i did so as a lace circle and not with the pink fgloral background.

The idea was that people could choose to use either the pink doily or turn it over and use the white side and then use a blue background for a boy.
 The flowers are by Altenew, simply stamped and coloured to match the background.
 The little white fans are cut from a border punch by Martha Stewart and the centres of the flowers are finished using Anitas 3D Gloss.

The idea was that people could choose to use either the pink doily or turn it over and use the white side and then use a blue background for a boy.


Thursday 16 June 2016
Peek a Boo
Love bright colours and am a great fan of bunting so was really pleased with this layout.I think if I had been making this just for my album I would have been tempted to fill some of the "white space" with background stamping but I know some classmates are not keen on that.
 I added the banners at the bottom and top right to bring the layout together.
 I used embroidery thread as the bunting string and a flower cut from the paper as the final embellishment.
 Loads more inspiration to come so keep checking back and if you can, please leave a comment. I love hearing from you and it lets me know someone is reading the blog lol. xx


Wednesday 15 June 2016
Birthday Boy
I love using white on white. I've found over the years that most papers are a slightly different shade of white from the next making it easy to distinghish between white elements on a page.
 The little swirls were a stamp and I added pen dots and little gems.
 Will use stamped shapes again.
 More tomorrow xx


Tuesday 14 June 2016
Cassette Tape
An oldy but goodie, this would make a great card for someone who remembers the old cassette tapes. I remember dropping a cassette and all of the tape coming out and then using a pencil to wind it back up.
Again a stamp from Creative Stamping. I am definately going to use this on a scrapbook page.
 The tape was made using a plastic bag cut into strips and coloured using a black Sharpie.

It was only in class that I realised I could have used a black plastic bag. Silly me xx
Again a stamp from Creative Stamping. I am definately going to use this on a scrapbook page.


It was only in class that I realised I could have used a black plastic bag. Silly me xx
Monday 13 June 2016
A little bird told me.....
If you follow this blog you will know that I am a big fan on the free stamps I get every two months on my Creative Stamping magazine. This beautiful floral wreath was on a set from a while ago however I spotted it in my stash and decided to give it a go.
 If you look carefully you will see that the card on the right is stamped and coloured, so nice and simple. The card on the left has a decoupaged yellow flower and little twinkles on the gemsones to give it a lift.
If you added an extra bird I think this would make a great wedding invitation. xx

If you added an extra bird I think this would make a great wedding invitation. xx
Sunday 12 June 2016
Choices, Choices, Choices
I love seeing the faces of all my classmates when they are told that the have to CHOOSE their own paper. I made this card and purposefully chose a really busy patterned paper for the chair.
Here is the result.
 The idea was to allow everyone to make their little girl stand out better than mine and everyone did really well. Here are a few of the works in progress.


 Good work everyone. Love the colours xx
Here is the result.


Saturday 11 June 2016
Paperartsy Birthday
At the beginning of the year I visited Stamperama in Stevenage and fell in love with all of the wonderful examples on the stand. My favourite was this set.
 and so of course I had to use it for a card and this is what I made for the card class.
 There are loads of these stamps to choose from and you can find this one HERE. Hope you like it xx

Friday 10 June 2016
Family
As you know by now I love my stamps and believe me I have hundreds. Stamping is a fantastic way to make lovely scrapbook layouts and a great way for a card maker to start their first page.
This layout was inspired by a canvas I saw on pinterest a few weeks back. I would have loved to have time to make the canvas but settled for a layout instead.
 Most of the decoration was done before adding the photos although I always start a layout with black card pieces the same size as the photos I will eventually use. This allows me to work out where everything should go.

 I am working on a beginners tutorial so keep checking back. xx
This layout was inspired by a canvas I saw on pinterest a few weeks back. I would have loved to have time to make the canvas but settled for a layout instead.


Thursday 9 June 2016
Blackberries
I have been saving these wonderful blackberry stamps and dies by Sheena Douglas, for ages. In my studio I have a " to be used" box filled with scrummy stamps, dies, stencils and paints to use at some point in the future.
In the first layout for Tuesday's Scrapbook class I wanted to use a photo of my granddaughter and lo and behold, she is wearing a lilac cardigan in it so out came the blackberry stamps and a beautiful purple promarkers.
 These stamps are so detailed they look good stamped in black without colouring in.
 The blackberries were made to look more realistic by using a foam mat and embossing tool
 And just a little bit of detail in the top right hand side to finish it off.

 More tomorrow xx


Subscribe to:
Posts (Atom)